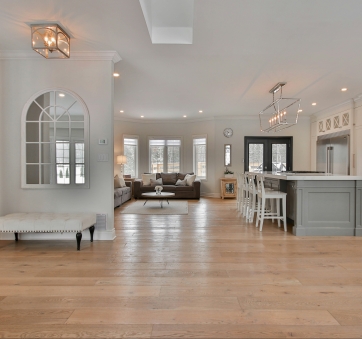
6 Types of Flooring to Consider for Your Home

lotus-design-n-print-Ae-KSk1yM_A-unsplashPaint can transform a space, but flooring is a key design element that is just as visually impactful. The flooring you choose can set the stage for your space, making it feel modern, cozy, or rustic – whatever look you are going for. There are many components to consider when choosing the type flooring, from aesthetics to price, durability, and upkeep. So how do you choose?

Here are 6 popular flooring materials, along with the pros and cons for each:

Hardwood – Hardwood flooring is timeless and has been a long-time favorite due to its beauty, warmth, and durability. If the material gets damaged or scratched it can be sanded and refinished multiple times and can last for decades. Wood flooring tends to be the most expensive and it’s best to avoid installing in ‘wet’ environments like a bathroom or basement.

Engineered Wood – A thin veneer of real wood is bonded to layers of structural plywood to create engineered wood flooring. Just as durable as hardwood, easier to install, and slightly easier on the wallet, engineered wood floors are a great alternative to hardwood and will achieve the same look. The biggest con – the thinner top layer can’t take as much refinishing so it requires more looking after.

Vinyl – The fastest growing category of flooring, vinyl ranges from inexpensive sheets and adhesive tiles to luxury vinyl tile (LVT) that imitates natural wood planks and tiles. Vinyl is easy to install, budget-friendly, and waterproof – making it a great option for bathrooms and basements. The material is durable, but once it starts to show wear or is damaged, it cannot be refinished, only replaced.

Laminate – Dense fiberboard is topped with a photo of the actual material and a layer of laminate to protect the surface. An affordable option, laminate is offered in wide range of colors and styles to suit your aesthetic and is DIY-friendly, eliminating the cost of installation. The material is susceptible to moisture damage and cannot be refinished, only replaced. Laminate can offer a high-end look, but the repetition of pattern tends to give away its ‘fakeness.’

Tile – Available in countless colors, shapes, and styles, tile is the perfect choice to add some character to a space. Tile is durable, waterproof, and low-maintenance, but can be difficult to install and cold on the feet.

Carpet – Soft underfoot, carpet is the most comfortable flooring material and also offers noise reduction and thermal insulating qualities. It is available in a wide range of colors and patterns, as well as synthetic and natural fibers that vary significantly in price and quality. Carpet holds dirt and dust and will eventually wear and need replacing.

If you are thinking of updating your space with new flooring, consider your budget, home aesthetic, and goals as a homeowner. Need a second opinion? Contact us to see what will get you the biggest bang for your buck when selling your home.

Should I Paint My Ceiling?

pexels-nataliya-vaitkevich-5641421If you want to get the highest price for your house when it’s time to sell, then you need a professional to assess your property’s condition. Buyers scrutinize your house and property from top to bottom. One question that sellers often ask is, “Should I paint?” And, as you can imagine, the answer is specific to each situation. There is one painting job that you should book right away, however.

“Yes, paint your ceiling!” In your everyday routine at your house, you most likely avoid looking up at your ceiling. If you’re like most people, you have a busy, hectic life and don’t spend a lot of time gazing up at your ceiling. Odds are that at one time or another, in one room or another, your ceiling fell victim to a water leak. Whether it’s an overflowing bathtub or a roof leak, many houses have been repaired but these problem areas have not been repainted .

While it may be a minor blemish on your ceiling it is magnified in the eyes of the buyer who is already planning on making minor or major changes to your house. So, go ahead and book your painter or get the supplies to do it yourself. If you are curious about other things that should be addressed prior to opening your house up to potential buyers, contact us to learn about our Prep for Success Program that streamlines your home selling experience.

3 Solutions to Your Messy Garage

Organized Garage 2 copyHow many times have you tried to organize your garage? Our garages are filled with tools, flower pots, outdoor equipment, and random items that don’t fit in the house. Before you know it your garage is a defacto storage unit. What is the solution? We met with Kerri Salls, owner of Inspired Closets in Williston, Vermont for her top 3 garage organization tips.

1. Overhead Storage – Isolate items that are rectangular in shape and put them on an overhead rack or shelves. This is a good solution for items that you do not need every day. Use storage totes for holiday decorations (don’t forget to label the tote for seasonal retrieval). Other items that can be stored “above” include suitcases, coolers, pet kennels, and other totes.

2. Floor Storage – According to Kerri, “If it has wheels, it belongs on the floor.” Once you get items up and out of the way in overhead storage it becomes easier to accommodate your snowblower, lawn mower, and lawn fertilizer cart.

3. Recreation Equipment Storage – Canoes, kayaks, bikes, skis, etc. have their own unique storage solutions. When storing these items keep in mind how frequently you use these items and the ease of access.

If you are ready to tackle your garage and convert it from a storage unit to a place to park your vehicle, then it’s time to get some professional help. We recommend Inspired Closets for all of your garage inspo as their showroom will motivate you to organize all of your stuff! Their design experts will work with you to customize the best organization solution to fit your needs.

Pops of Pink: Painting Outside of Your Comfort Zone

pink living roomHave you ever heard of a color consultant? Betsey Dempsey, Color Concepts Vermont, helps clients pick out colors for their spaces. Her role is different than an Interior Designer. One way to bring new life to your house is to change the paint colors in your rooms. Paint color trends change every few years, so if you want your house to look fresh and updated a color consultation may help transform your space.

She specializes in helping people choose paint colors. “I try to get them to think beyond their comfort zone,” she says. After all, that is why they are hiring her to show them more options other than the usual “safe” colors.

Eggshell or Matte? The type of paint matters, matte finish is washable and can be blended more easily than eggshell for touch-ups. The sheen of eggshell fades over time and it is harder to touch-up.

What is trending now for paint colors? For the past few years gray tones have dominated the color palette of interiors. According to Betsey, “the cold gray tones are now being modified with more warmth, think taupe.” She is also seeing more contrast with painted trim and complimentary wall colors. “Trim does not need to be white, we are seeing dark charcoal or medium gray trim and door colors that pair nicely with off-white walls.” It’s important to use warm and cool colors together to balance room tones.

What about pink? Surprisingly, pink is one of Betsey’s favorite colors and it is becoming very popular. She likes Benjamin Moore’s “Opal” color with soft warm pink tones in any room, even ceilings which can bring out the warmth of a room.

If you are looking for recommendations for painting your space or a color consultant, check out Betsey Dempsey’s website – colorconceptsvt.com.

Photo by: Simone Haag in Collaboration with Nathan + Jac; Photo by Eve Wilson

Should I Put Up Wallpaper or Paint?

CorduroyPine1To be perfectly honest, we do not see many houses with wallpaper. In the 1970s wallpaper donned many kitchens, bedrooms, and living rooms. In the 1990s wallpaper borders were popular in living rooms, bathrooms, and kitchens. Today, however, with the influence of HGTV and other media, neutral pallets dominate the general decorating “vibe.”

From this month’s HGTV magazine that featured a plethora of “paint” choices to our visit to our local interior design studio, Corduroy + Pine, we are leaning toward the return of wallpaper and bold, bright colors to refresh spaces.

Yes, you are thinking, “What happens when I go to sell my house?” Unfortunately many decorating decisions are based on what the “future buyer” will want when they tour your house. In fact, trends change often and it is hard to predict what will be “in or out” as far as decorating when it’s time for you to sell. That is why, most of the time, people choose to live in a neutral environment. Why not add some color or “pop” to your living space?

Most people who crave color or adding some personal style to their houses start small when transitioning away from neutrals. According to Elizabeth Dececco, lead stylist at Corduroy + Pine Interiors, “I have many requests for wallpaper for the first floor half bath.” This is a good place to dip your toe into the wallpaper trend. If you are thinking about wallpaper for a foyer, rear entry, or bedroom, it is best to consult an interior designer to avoid missteps.

If you are thinking about adding color, wallpaper, or texture to your house give us a call and we will point you in the right direction. Remember, it’s also best to consult a professional when it comes to selling your house as we will set you up for success if you are thinking about redecorating or refreshing your space.

3 Exterior Tips to Impress Buyers

Vincenza FrontMaybe you “shouldn’t judge a book by it’s cover,” but, in the real estate arena Buyers do judge houses from their exteriors. Serious buyers will spend several minutes looking at the outside of your house before they even step inside. Many of us focus on the interior of the house when getting prepared to sell. This makes sense, of course, since buyers focus on interior photos when deciding whether to consider or eliminate a property.  Once they make the trip to the house, however, it’s the outside that makes the first impression. Here are our top tips for elevating your exterior to impress buyers:

1.     Exterior Lighting – This is one of the most overlooked “staging” items in a house. While many of us spend time updating the lighting fixtures inside, few of us understand the importance of updating exterior lighting. If the exterior lighting, walkway lampposts, front door wall sconces, and/or garage lighting is dated then it’s time to replace them.  Make sure you keep with the “theme” of your interior. For example, if your interior is modern then you don’t want to pick Colonial style brass fixtures.

2.     Front Steps and Walkway – You may have become accustomed to the greenish tint on your concrete steps or the degradation of grout lines on your brick steps, but buyers notice these items immediately. Power washing, re-grouting, and a general freshening will go a long way in letting buyers know that you care about the maintenance of your property. Likewise, picking weeds from brick walkways, sweeping the path, and trimming back shrubbery will give your property a manicured look. It’s no fun to bushwhack your way to a front door and climb up steps that are neglected. Remember, the agent is leading the way and has to spend a minute or so unlocking the house so buyers have time to scrutinize the exterior while they wait to go inside.

3.     Front Door, Storm Door/Screen Door – This seems obvious but many of us access our house from the garage so we never bother to go through the front door. If your storm door or screen door needs repair then repair or replace it. If your front door paint is faded then it’s time to repaint. Most importantly, the hardware on your front door can “date” your house. Upgrade and update your front door handle and lockset. There’s nothing worse than buyers watching their Realtor struggle with an outdated lockset to open the door to the house.

Once a buyer makes a commitment to set up an appointment and visit the property then the exterior becomes one of the most scrutinized parts of the house tour. If you want a professional design opinion on any of these tips, contact us to see how to get your property in tip top shape for the Spring market.

6 Spring Cleaning Projects to Tackle for a Sparkling Home

pexels-jos-van-ouwerkerk-1075960Spring is just around the corner (March 20th to be exact), which means warmer temps, green grass, beautiful blooms and everyone’s favorite – Spring cleaning!

Here are 6 of our top Spring cleaning projects to get you started:

Complete a Thorough Dusting – You may swipe your Swiffer duster through the surfaces of your home on weekly basis, but we’re talking about getting down and dirty here. Remove all of the items from shelves and tabletops and give the surface a good wipe down with a multi-surface cleaner or furniture spray. Now is also the time to tackle ceiling fans and the top of cabinets.

Wash Walls, Cabinets, and Baseboards – Vertical surfaces may not look dirty, but enough dirt and dust cling to these surfaces to justify a seasonal cleaning. Use a clean sponge and water mixed with a few drops of dishwashing liquid to wipe down walls, cabinets, and baseboards.

Wash Windows – Step it up a notch from your normal Windex and paper towel routine and really take a minute to get your windows to sparkle. Vacuum the inside panes, sills, and window frame. Choose a cloudy day to clean your windows to prevent streaks – heat from the sun will dry the glass too quickly. Create a window wash solution by combining 1/2 cup sudsy ammonia (which is a specific type of ammonia), 1 pint of rubbing alcohol, 1 teaspoon of dishwashing liquid, and 1 gallon of water.

Refresh Window Treatments – Just like your walls, they may not look dirty, but dust clings to everything! Take down and throw washable fabrics in the washer and air dry. Intricate curtains and draperies can be cleaned using the upholstery attachment on your vacuum, or you can take them to be dry cleaned. To remove dust from sheers, toss them in the dryer on low with a fabric softener sheet.

Clean Carpets – Rent a carpet cleaner and start with a hidden spot of carpet to make sure the treatment will not cause discoloration. To save yourself some time, move furniture slightly rather than clearing out a room. Place wax paper squares under the feet of furniture to protect the carpet and keep the furniture from getting wet as the carpet dries. Open windows to speed up the drying process. Don’t feel like all the work? Hire a professional to take care of the carpets for you.

Freshen Your Space – Not so much a cleaning project, but a quick and easy makeover for any room is changing up or adding textiles! Put a brightly colored table linen on your dining room table, spruce up your living room with fun throw pillows or a patterned rug, swap out your bedding, or switch out the towels in your bathroom – any of these will revive your home for Spring.

If you need a list to stay focused, or if you love the satisfaction of checking off a task when completed, we found a very thorough downloadable Spring cleaning checklist from Better Homes & Gardens.

Have You Seen The Muffin Pan? 5 Tips For Reorganizing Your Kitchen

kitchen cabinet storageTrue story – Carolyn spent most of this month looking for a muffin pan that she knew was somewhere in the kitchen. But where? The muffin pan odyssey led to a complete “redo” of her entire kitchen cabinets, drawers, and the troublesome lazy susan corner cabinet. This journey led to our 5 tips for reorganizing your kitchen:

  1. Take an inventory of the items in your kitchen and give away your “multiples.” Everyone love a good frying pan. How do you love 7 frying pans stacked on top of each other? Pick your favorites and find another home for the rest. We are giving the extras to a friend who just bought a second home and needs to stock a kitchen.
  1. Group all “like items” together. This advice would have saved hours of time searching for the muffin pan. All baking pans in one drawer. Period. Same advice for mixing bowls. This step, combined with the “inventory of items” led to another donation of two sets of bowls.
  1. Use containers in your drawers. I have to admit, this was not my idea. When a good friend, and, as I discovered a member of a professional organizing group visited my house I took her on a tour of kitchen. When I opened the drawer for pot holders, aprons, and kitchen towels they had already jumbled themselves together. While the grouping of “like items” together was successful the drawer was still messy. She suggested that I put the tea towels, aprons, and pot holders in their own separate plastic cubes/containers in the drawer to keep them divided. Brilliant! Thank you!
  1. Rethink your routines. Pet confession – our dog’s food, treats, medication, and pet bowls took up the entire base of our lazy susan corner cabinet. Every day we would spin the wheel to feed our furry friend. After the purging of the frying pans we had an entire drawer that was empty. To our amazement all of the dog items fit nicely into the empty drawer. Bonus space reclaimed in the lazy susan.
  1. Toss all spices that you never use. I’ll admit this isn’t easy. As soon as I toss the Old Bay Seasoning I will need it for a recipe, right? If your spices are overflowing you have to make some tough choices. If you haven’t cooked with that spice in a few years then it’s safe to say it’s not a keeper. We said goodbye to curry paste, mustard seeds, very old bay leaves, and whole peppercorns (we don’t have a grinder).

Where was the muffin pan anyway? In the midst of the entire kitchen redo we really can’t remember where it turned up. Now it has a home in the baking pan drawer. Blueberry muffins anyone?

It’s Not The Heat, It’s The Humidity: When Do You Need a Dehumidifier

dehumidifiers-kr-2x1-tease-200716It’s been a hot and humid summer here in the northeast. Temperatures and humidity levels have been similar to those in the south. Sometimes the “sticky” feeling creeps into your house making it damp, unpleasant, and smelly indoors. Laundry in the basement level of your house can create the perfect storm of dampness and moisture.

If the humidity level hits 50% then it’s time to take the moisture out of the air. High levels bring unwanted problems – mildewy smell, dampness, and sometimes mold. A dehumidifier pulls moisture from the air and replaces it with dry air. You will need to empty your dehumidifier at least once a day. Many people run a hose to a basement utility sink. Just make sure that the hose doesn’t get knocked out of the sink, then you will have unexpected water on the floor – yes, that’s happened to me, but that’s another story.

Take It Outside: 3 Tips To Stage Your Backyard, Porch, or Deck

deck-decorating-63Summer is officially here and it’s time to get your exterior living spaces “show ready.” Even if you’re not selling your house it’s fun to add some quick and easy items to your outdoor spaces.

From decks to patios to porches, here are our top 3 tips:

Patio pots filled with annuals – Colorful patio pots are trending right now. The bigger the better! Instant color and décor for your pool area, deck, or front porch.  If you’re local, pick one up at Red Barn Gardens, RedBarnGardensVT.com.

Summer wreath for your front door – Wreaths aren’t just for Christmas! Add a decorated grapevine or straw wreath to compliment your style. Looking for inspiration? Lemons, strawberries, or even a red, white, and blue theme will make your front door “pop.”

String lights – There’s always a spot for string lights on your porch, patio, railing, or even in front of your garage. If you don’t have an electricity source try some solar lights.

We specialize in staging your home for sale or just for fun! Contact us today for a complimentary home visit for more tips, tricks, and “on trend” advice.